|
型号 |
Firmware版本 |
|
GSM7228PS |
8.* |
|
GSM7252PS |
8.* |
|
GSM7328S |
8.* |
|
GSM7352S |
8.* |
|
GSM7328FS |
8.* |
|
GSM7328Sv2 |
8.* |
|
GSM7352Sv2 |
8.* |
一、网络拓扑及设置目标
- 网络拓扑:

- 设置目标:
设置用户登录网页时,弹出用户名密码输入窗口,认证通过后才能登录。
二、使用内置数据库配置步骤
- 打开一个已经配置好IP和VLAN路由的交换机页面,进入Security/Control/Captive Portal/CP Global Configuation页面,如下:
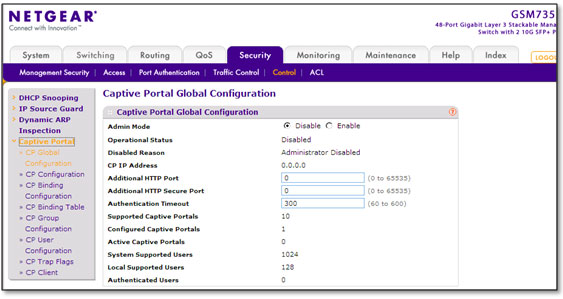
- 启用Captive Portal功能。
点选Admin Mode为Enable,其余为默认设置,点击Apply应用。

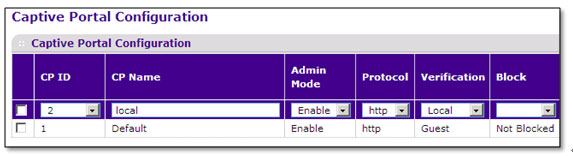
- 进入CP Configuration页面,创建Captive Portal策略:
CP ID选为2,Name为自定义例如local,Admin Mode选为Enable,Protocol选Http,Verification选Local表示使用本地数据库验证,其余保留默认配置,点Add添加。
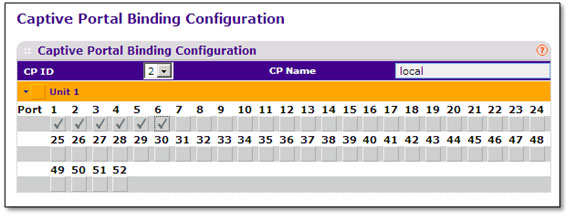
- 将Captive Portal策略绑定到端口:
在CP Binding Configuration页面,选择CP ID为2,点击Unit1展开交换机端口列表,选择要应用的端口如1-6口,点击Apply应用。
- 建立用户信息:
在CP User Configuration页面,User ID填一个实数,系统将自动从1开始,用户名为英文字母和数字如“cp1”,在Password和Confirm Password处设置密码如“password1”(密码受交换机设置的最短密码位数限制,默认最短为8位),点击Add添加。|
重复该步骤添加多个用户:(交换机最多支持128个内置用户名)

- 检验结果。
将电脑接入1-6其中一个端口,在拥有合法IP地址的情况下尝试登录网页如www.netgear.com.cn,浏览器页面将转到认证登录页如下(需要关闭弹出窗口阻止程序):
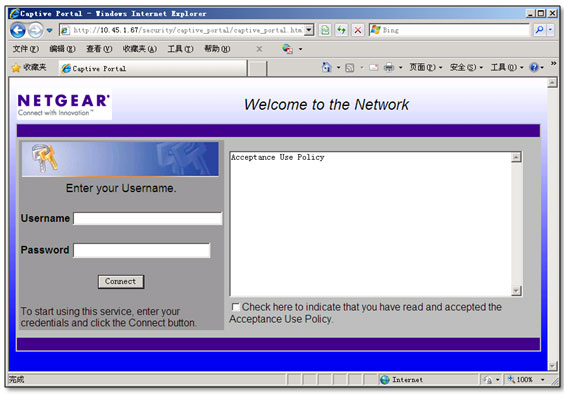
输入用户名cp1,密码password1,选中“Check Here to ……”前面的复选框:

点击Connect,验证成功后显示以下页面:
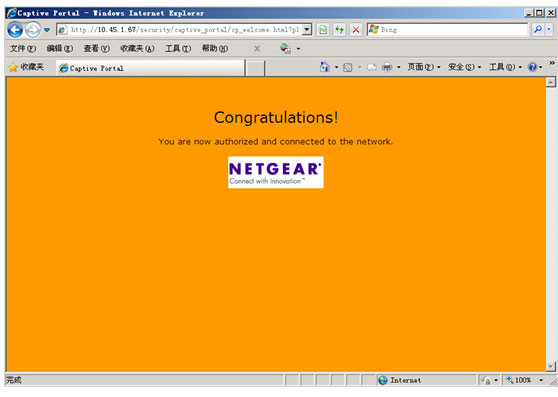
认证成功后,就可以打开其他网页了。
三、使用RADIUS服务器的设置步骤
- 设置RADIUS Server,在Security/Management Security/RADIUS/Server Configuration页面,Radius Server IP Address下填服务器的IP地址,Secret Configured选为Yes,在Secret 下填入与RADIUS服务器匹配的密码,Primary Server选为Yes,其他保留默认(Radius Server的名字不要改),点Add添加。
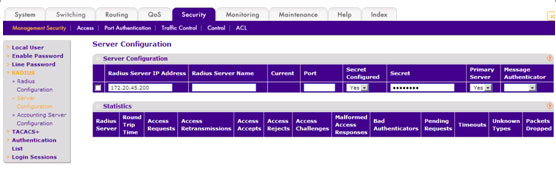
添加后,交换机自动为RADIUS Server命名为Default-RADIUS-Server如下图:
- 启用Captive Portal功能。
在Security/Control/Captive Portal/CP Global Configuation页面点选Admin Mode为Enable,其余为默认设置,点击Apply应用。

- 进入CP Configuration页面,创建Captive Portal策略:
CP ID选为3,Name为自定义例如radius,Admin Mode选为Enable,Protocol选Http,Verification选RADIUS表示使用RADIUS数据库验证,其余保留默认配置,点Add添加。

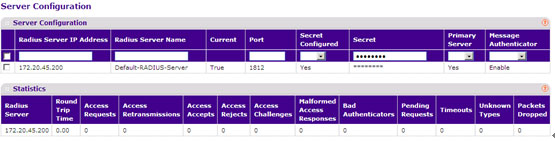
添加后,交换机将自动引用当前RADIUS的名字Default-RADIUS-Server:

- 将Captive Portal策略绑定到端口:
在CP Binding Configuration页面,选择CP ID为3,点击Unit1展开交换机端口列表,选择要应用的端口如7-12口,点击Apply应用。

- 设置RADIUS服务器及用户信息,RADIUS服务器设置不属于NETGEAR技术支持范围,本文以Windows Server的IAS简要设置为例:
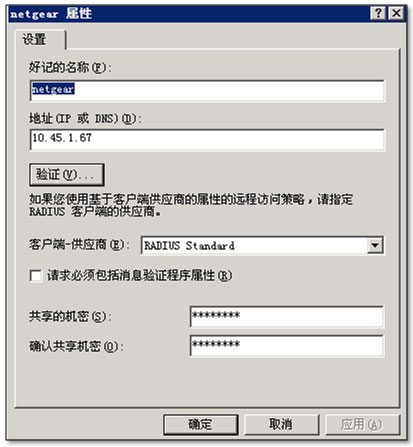
- 新建NAS客户端如netgear,填上交换机的IP地址和密码:
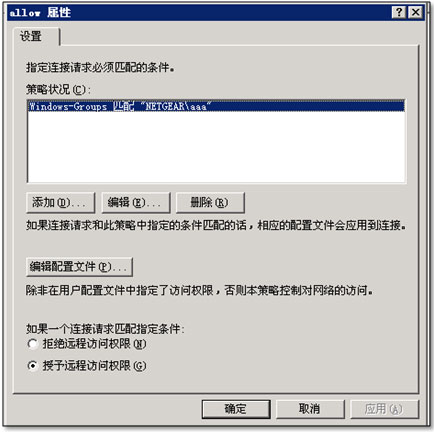
- 建立访问策略如allow,匹配windows的aaa组将授予访问:
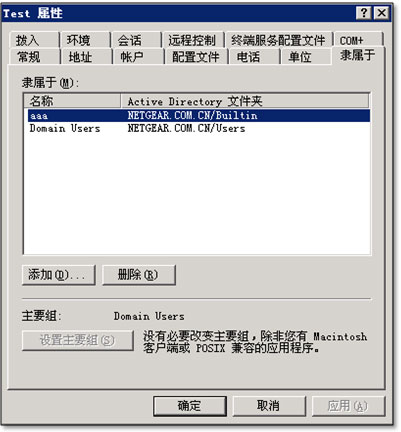
- 新建用户test将其加入到aaa组:
- 允许test远程访问:

- 检验结果。
将电脑接入7-12其中一个端口,在拥有合法IP地址的情况下尝试登录网页如www.netgear.com.cn,浏览器页面将转到认证登录页如下(需要关闭弹出窗口阻止程序):
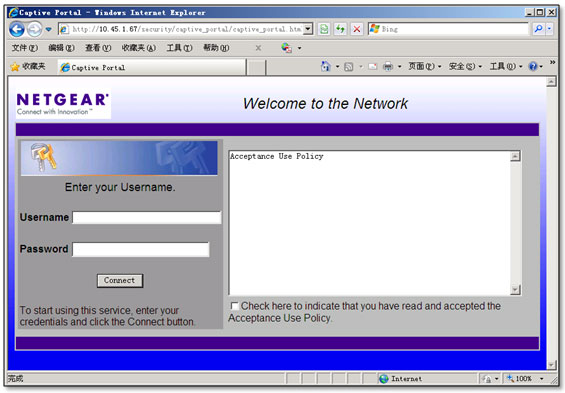
输入用户名test及其密码,选中“Check Here to ……”前面的复选框:

点击Connect,验证成功后显示以下页面:
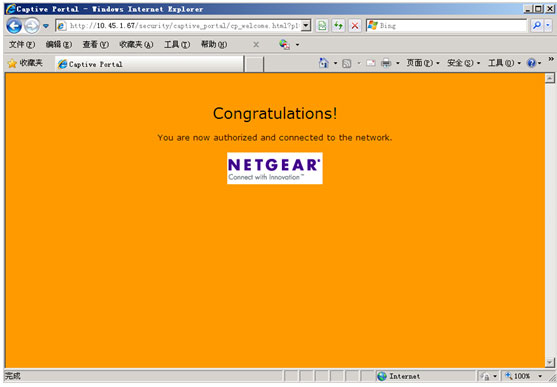
认证成功后,就可以打开其他网页了。
四、综合以上两节的命令行配置:
(GSM7352Sv2) #show running-config changed
!Current Configuration:
!
!System Description "GSM7352Sv2 - 48-Port Gigabit Layer 3 Stackable Managed Swit
ch with 2 10G SFP+ ports"
!System Software Version "8.0.3.11"
!System Up Time"0 days 10 hrs 28 mins 32 secs"
!Additional PackagesFASTPATH QOS,FASTPATH Multicast,FASTPATH IPv6,FASTPATH
Stacking
!Current SNTP Synchronized Time: JAN 10 08:41:18 2011 UTC
!
network protocol none
network parms 10.45.1.67 255.255.254.0 10.45.0.13
vlan database
exit
configure
sntp client mode unicast
! sntp server status is active
sntp server time-d.netgear.com
stack
member 1 5
exit
ip name server 10.45.0.6 10.45.0.7
slot 1/0 6
set slot power 1/0
no set slot disable 1/0
ipv6 router ospf
exit
aaa authentication enable "enableList" enable
radius server host auth 172.20.45.200 name Default-RADIUS-Server
radius server key auth 172.20.45.200 encrypted 928336800ccca32a4c218d5e93108e703
dad3e30eb75db3c27f7b3ac28165aa77ec7263798fd94aa5434fe1eb81eaf68098a738325ae8142c
d846c353f8bc154
radius server primary 172.20.45.200
line console
exit
line telnet
exit
line ssh
exit
spanning-tree configuration name "00-1F-33-F9-20-C3"
!
captive-portal
enable
configuration 2
name "local"
verification local
interface 1/0/1
interface 1/0/2
interface 1/0/3
interface 1/0/4
interface 1/0/5
interface 1/0/6
exit
configuration 3
name "radius"
verification radius
radius-auth-server "Default-RADIUS-Server"
interface 1/0/7
interface 1/0/8
interface 1/0/9
interface 1/0/10
interface 1/0/11
interface 1/0/12
exit
user 1 name "cp1"
user 1 password encrypted 88502fd8ae6eedbf0ed4414854f9c6601f04c33c4462cfd2378806
c8f9fcb9c7208cb303d2c505b593a8cf1212d785bce9b2d31584df2098756dc0d0f6a62ab0
user 1 group 1
user 2 name "cp2"
user 2 password encrypted 5059fa9a87188e5c167144c82685310fa1e2371faa65c3351f0488
071904f61f58258a41ef9889f0bd6416d2af0c33b1a6e8ca4898f160342bc24e23e0848b20
user 2 group 1
user 3 name "cp3"
user 3 password encrypted 4ffc66aaaa4807ef41e16f7a0bbb3a48db9134e0e1d866509fb2f0
user 3 password encrypted 4ffc66aaaa4807ef41e16f7a0bbb3a48db9134e0e1d866509fb2f0
user 3 group 1
exit
interface 1/0/49
no auto-negotiate
exit
interface 1/0/50
no auto-negotiate
exit
interface 1/0/51
no auto-negotiate
exit
interface 1/0/52
no auto-negotiate
exit
router rip
exit
router ospf
exit
exit
|
序号 |
日期 |
工程师 |
更新摘要 |
|
1 |
2012-04-06 |
ZhiJie Ou |
文档归档 |